


 Caldwell College book signing


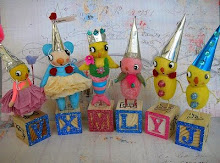
Baby Bailey Treasure Box....with Tutorial!

This pretty little altered box was made using a simple wooden box and a Lisa Kettell Designs 'Baby Bailey' style molded doll. I love these little molded dolls!

Supplies:
Baby Bailey Molded Doll 3 inch
Small wooden hinged box with lid
Fabric flowers and leaves
Tacky Glue
Decoupage glaze
Acrylic Paint
Decorative napkins
Gold Rub n Buff
Distress Ink
Glitter
Directions:
1. Glue Baby Bailey to the top of your box using Tacky Glue and let dry. The box I used had a little inset in the top which was perfect for placing my little doll.
2. Paint the inside of your box with acrylic paints, let dry.
3. Collage a pretty paper napkin (separated from it's white base layer) onto the outside of the box (avoid covering the hardware) using matte medium and then paint to add more color if you wish.
4. Glue small fabric flowers around your Baby Bailey, add leaves and other small floral accents until you like how it looks.
5. Glue a word or other embellishment on to Baby Bailey's tummy if would like.
6. Apply a thin coat of decoupage glaze to Baby Bailey and the flowers, being sure to coat them evenly. Add more thin coats as needed until you are happy with how it looks.
7. When the last coat on the top is completely dry, add a thin coat to the rest of the box if you wish.
8. When all is dry, use distress ink to age and add dimension.
9. Use gold Rub n Buff on the edges of the box and on the hardware.
10. Add glitter if you wish and then let it all dry.
Please be sure to visit Lisa Kettell's Moonfaire'sWorld for lots of other fun art stuff for your mixed media projects! xo
___________________________________________________________________________________
I love love love Kim's newest project, this is amazing, I love what she did with the Bailey Style, I'm drooling over here, can't wait to try this! xoxo


No comments:
Post a Comment